Notes on how to set up a Linux kernel development environment
As part of my classes on Open Source Software (OSS) my whole class (not shy of 50 students) is going to start working on Linux Kernel Development. This post is a series of my experiences throughout the class related to kernel development. This is a really exciting opportunity because Linux is the biggest open source project of all time and one of the most important pieces of software history, it is a big part of my life as being my most important OS since I was 16 years old, which was already 10 years ago. I never imagined attempting to make a change in the more than 30 million lines of code that is the Linux repository.
What is Kernel Development?
"If you wish to make an apple pie from scratch, you must first invent the universe" - Carl Sagan, Cosmos
In a student oversimplification, the kernel itself is a piece of executable code that sits just above hardware. It is a critical part of the operating system which exposes certain user actions through interfaces (syscalls) to connect directly with all computer hardware through architecture-specific binaries (device drivers).
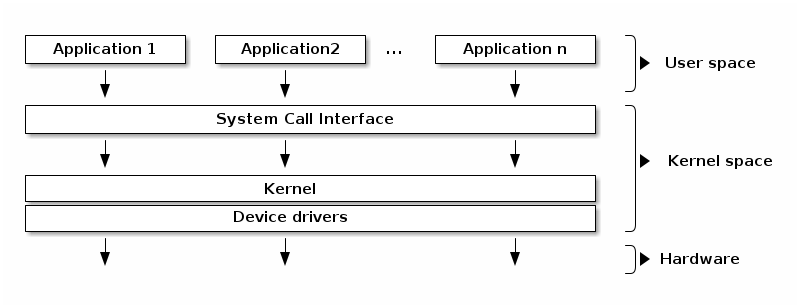
This means that everything executed in the kernel is highly sensitive, it directly connects with hardware and runs with kernel-level permissions. If you want to know more about the kernel, how syscalls work and how device drivers are constructed, check the Modern Operating Systems book by Tanenbaum, section 1.6.
Why does this matter?
Kernel development means writing C code that runs in that privileged space, be it in device drivers, file system modules, scheduler patches, or even just fixing a bug. A mistake doesn't crash your program, it crashes your entire OS. That's the reason we need the VM setup described below and the strongest argument which leads all kernel developers to always use another machine or vm.
What is needed to develop in the Linux kernel?
To start developing in the Linux kernel you need (1) a computer with Linux and (2) the ability to compile the kernel. Of course, having the computer running Linux compile the kernel it is going to use would make everything simpler, right?
Well, as mentioned before, the kernel is a highly sensitive piece of the operating system, and compiling the kernel on your own machine can cause disturbances that will be hard to solve and sometimes even require a USB boot device to fix the kernel installation.
For this we will follow the isolation principle and create a development environment which will have a virtual machine running the Linux compiled by us, so that we can safely make changes to the kernel.
Setting up your Linux kernel development environment
I followed through the whole tutorial [1] and I think you should too! It is detailed enough so that you can create your own Virtual Machine.
My experience following the tutorial was not very smooth. The main problems I encountered are listed below.
Installing Tutorial Dependencies - NixOS
This is the trickiest part of my setup. I use NixOS which means my main package manager for libraries and OS packages is the Nix package manager. This combination of Nix and NixOS usually works incredibly well and out of the box for most things, but for specific packages that require direct communication with the operating system, it can fall short compared to other package managers. For example, the section with:
# Arch-based distros
sudo pacman -Syy && sudo pacman -S qemu-full libvirt virt-install guestfs-tools wget
# Debian-based distros
sudo apt update && sudo apt install qemu-system libvirt-daemon-system virtinst libguestfs-tools wget
# Fedora-based distros
sudo dnf update && sudo dnf install qemu libvirt-daemon virt-install guestfs-tools wget
For me, it became the following steps:
- Adding the qemu_full package from the nixos-stable channel (I use the unstable which had the package broken), in configuration.nix:
# configuration.nix
environment.systemPackages = with pkgs; [
    #.... Other packages
    (import <nixos-stable> {
      inherit system;
      config.allowUnfree = true;
    }).qemu_full
];- Enabling the virtualisation option in NixOS, in configuration.nix:
# configuration.nix
{ config, pkgs, ... }:

{
  virtualisation.libvirtd.enable = true;
  programs.virt-manager.enable = true;

  users.users.elliancarlos.extraGroups = [ "libvirtd" "libvirt-qemu" ];
}- Adding the other needed packages, in my case this was in home.nix because I use home-manager:
# home.nix
  libvirt
  libguestfs-with-appliance
  guestfs-tools
  wget
And this is all you need to add to get these packages working, you probably won't need all of this, and the tutorial instructions should be enough for you.
After making these changes, apply them by running:
sudo nixos-rebuild switchAlso note: after adding yourself to the libvirtd group, you need to log out
and back in (or run newgrp libvirtd) for the group membership to take effect.
Until you do, you will hit permission errors when trying to manage VMs.
The so-called activate.sh
The tutorial uses a bash script called activate.sh to export variables used
throughout this and many other tutorials, which is handy. However, I don't use
bash, I use zsh (Z Shell) instead, which makes the
#!/usr/bin/env bash shebang incompatible with my setup. On top of that,
shebangs are generally unreliable on NixOS because binaries are not served at
predictable paths like /usr/bin/bash, they are stored under a hash-based path
that encodes their version and content, allowing multiple versions to coexist.
So I needed to adapt the script, and mine ended up like:
#!/usr/bin/env zsh

export LK_DEV_DIR='/home/elliancarlos/Projects/software-livre-aluno-especial'
export VM_DIR="${LK_DEV_DIR}/vm"
export VM_MOUNT_POINT="${VM_DIR}/arm64_rootfs"
export BOOT_DIR="${VM_DIR}/arm64_boot"

local initrd="initrd.img-6.1.0-43-arm64"
local vmlinuz="vmlinuz-6.1.0-43-arm64"

prompt_preamble='(LK-DEV)'

launch_vm_qemu() {
  qemu-system-aarch64 \
    -M virt,gic-version=3 \
    -m 2G -cpu cortex-a57 \
    -smp 2 \
    -netdev user,id=net0 -device virtio-net-device,netdev=net0 \
    -initrd "${BOOT_DIR}/${initrd}" \
    -kernel "${BOOT_DIR}/${vmlinuz}" \
    -append "loglevel=8 root=/dev/vda2 rootwait" \
    -device virtio-blk-pci,drive=hd \
    -drive if=none,file="${VM_DIR}/arm64_img.qcow2",format=qcow2,id=hd \
    -nographic
}

create_vm_virsh() {
  local boot_opts="kernel=${BOOT_DIR}/${vmlinuz},initrd=${BOOT_DIR}/${initrd},kernel_args=loglevel=8 root=/dev/vda2 rootwait"
  sudo virt-install \
    --name "arm64" \
    --memory 2048 \
    --arch aarch64 --machine virt \
    --osinfo detect=on,require=off \
    --virt-type qemu \
    --import \
    --features acpi=off \
    --disk path="${VM_DIR}/arm64_img.qcow2",bus=virtio \
    --boot "${boot_opts}" \
    --network bridge:virbr0 \
    --graphics none \
}

echo "Entering shell session for Linux Kernel Dev"
echo "To exit, type 'exit' or press Ctrl+D."

# Proper zsh prompt formatting
export PS1="%B%F{magenta}${prompt_preamble}%f%b %~ %# "
I also don't run it as the tutorial suggests with ./activate.sh, instead I run
source activate.sh, which allows the exports to take effect in the current
shell session.
Image Download
The image linked in the tutorial is no longer available. To find a current one:
- Open the Debian cloud images daily build index.
- Pick the most recent date folder (the highest date number at the top of the list).
- Inside, look for the file named
debian-12-nocloud-arm64-daily-<date>.qcow2, thenocloudvariant is the right one for this setup. - Copy the full URL and download it:
wget --directory-prefix="${VM_DIR}" https://cdimage.debian.org/cdimage/cloud/bookworm/daily/<date>/debian-12-nocloud-arm64-daily-<date>.qcow2Then rename the downloaded file to match what the tutorial expects:
mv "${VM_DIR}/debian-12-nocloud-arm64-daily-<date>.qcow2" "${VM_DIR}/base_arm64_img.qcow2"Rest of the tutorial
The rest of the tutorial was relatively smooth, though it still took me a while to work through things like:
- Understanding why we use a
vdaX(a virtual block device) increate_vm_virshinstead ofsdaX(a conventional SATA/SCSI disk device), because once the.qcow2image is mounted, the VM sees it as a virtual block device, even though it is stored as a regular file on the host filesystem. - Dropping the virsh network setup and instead using the virtual machine's IP address directly to SSH in.
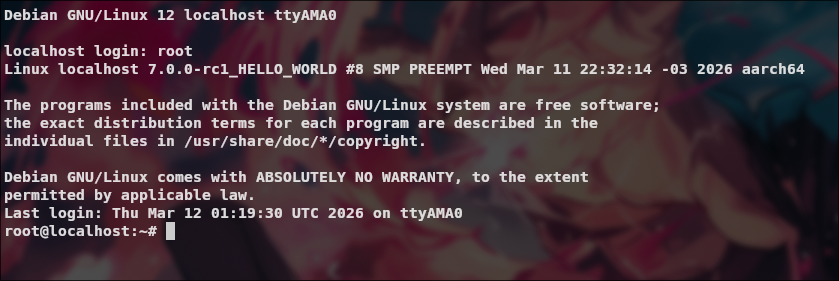
Otherwise, the tutorial is a really good start for having your own linux VM
available to be built and have custom kernel modules. A quick look into my
access to the VM created (sudo virsh console arm64) after the boot:
Conclusion
This experience was much harder than I thought and running it on an underpowered laptop was even harder, I think mostly this is related to NixOS-specific problems and my lack of problem solving experience with VMs, kernel inside the NixOS system. Nevertheless, this was a cool experience to have and the first step into developing changes for the Linux kernel which is the topic of the next post! See ya!
Bonus Flake
This setup is already involved, and the next step of building the kernel itself falls no shorter. A pragmatic shortcut is to either capture all of this in a flake once and reuse it, or borrow the flake of someone who has already gone through the same pain, for example jordanisaacs' kernel development flake.
References
[1] Setting up a test environment for Linux Kernel Dev using QEMU and libvirt, FLUSP, IME-USP
[2] Tanenbaum, Andrew S., Modern Operating Systems, section 1.6, System Calls